Posts

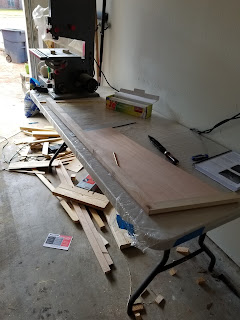
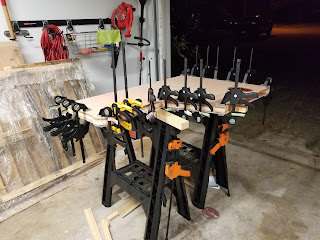
In the dead of winter we seal the keel

Image
So this December has been a month full of not boat building. First the weather, 27 degrees in Houston! Ice and snow! Then my work had me pumping 60 hour work weeks for two week straight to get a major project completed. But through out it all I chipped away at the things that I needed to do and finally! Sealed the keel, only step left on the keel is to glue the keelson on the top. I do have to fill a hole in the keel with Epoxy so the keelson will wait till Tuesday or Monday. But enough bitching, more boat building. Early December the weather was nice but the work was hard, so I snuck out in between router updates to hit up the local scrap yards to purchase lead. There were two near me and they had more then enough at a buck a pound. I filled my trunk up with lead roof flashing and fixtures and I also found a pile of really cool dive weights. Then the weather came and it was FREEZING cold in Houston and my garage spring broke! I had my car trapped in my garage for a bit till it was

Turkey days and wood shavings

Image
Slow blog updates! But it is the start of the holidays so that is to be expected. But the boat is still on track. Over thanksgiving I went out and visited family taking my first mate along and we had a grand time tramping around the south west United States. Once I got back I glued up my centerboard and filled the pivot and rope attachment point with epoxy. Very simple. Next I turned my attention to the final details of the keel. I made sure the bottom was nice and flat all the way across with my trusty plane and sander. I had to adjust the pivot hole in the keel as I messed up the alignment a bit. I also had to dig out a 1/2 inch of wood from the vertical support in the aft section of the keel. I thought no big deal go buy a chisel and a couple bangs later I would be done. HA! I got about 3 wacks in and tore a chunk out of the support. At the time I thought I made a massive error and felt like a fool. But after looking at the triangle shape of busted wood I got some thickened epox

Read the instructions three times, measure 47 times, cut once or twice

Image
This weekend was about putting it ALL together. All being the keel. I have never in my life been so scared. It started out in a good way, I dropped my centerboard trunk into place, trimmed and adjusted my nose block made a nice little piece of wood to fit between the nose block and centerboard trunk. I was ready to epoxy and this was Saturday morning! First thought that went through my mind is that I am getting REALLY good at this boat building thing, the second was Dunn and Kruger . So I stopped boat building for a few hours, went out spent some time with the first mate looking for important items like LOL Suprise Dolls (didn't find any) then came back. On my return I found the following: The centerboard trunk was reversed, easy fix. The cool dove tail at the rear end of the keel pushed everything forward by 1 centimeter. Not so easy, but not hard. There are these cool holes in the side of the keel that tells you if you fucked up, lucky I found them before I fucked up. S

Freezing weather sickness and.. progress!

Image
So Houston decided to drop into the low 40's! My garage is not insulate so no boat building that weekend. I did manage to glue up 2x6x18 blocks of wood that became my nose block during the week. I also researched the best way to make the rear aft blocking. It is starts out at 1-3/4" and tapers down to 3/4". After some friendly advice and some YouTube searching I found how to assemble a cheap and easy taper jig, using 2 blocks of wood and few screws. Here is the Link to that. So when Saturday morning came I was up and attacking the boat build. Fully covered in bug spray (DAMN YOU BUGS!) and chopping wood. I started with the tapered rear aft blocking. Starting with constructing the jig and running a few pieces of scrap wood through as tests I was ready to chop. Cutting the first side and was super easy, then about 1/2 way thought the cut on the second side I thought I messed up the cut. I was kinda disappointed but decided to try the pattern verse the cut wood and to

Mid week progress

Image
I found some time this week to join together the centerboard. After clamping, it appears to even be the right size! All Clamped up You can see the little board sticking out as I wanted to make sure the 1 inch of space is a sure thing, but after measuring that stick, it was larger than an inch so I pulled it out. After measuring all sides it is in the correct size. That is blood sweat and sawdust right there Also when gluing it together I added WAY more than needed thickened epoxy. The squeeze out was an easy mess to clean up as I took long and thin boards and scraped off the inside. After my learning curve I had a stick for every angle needed. Funny part about this piece is that I was so worried about it turning out wrong I ran out several times to make sure that it wasn't glued inside out and other various terrors that struck me in the middle of the night. Finally I got over my fear and accepted what may come and if it is off a bit I will adjust the best I can and ada

Give em the clamps!

Image
So I did not make all the goals I wanted this weekend. The reason being I suck at cutting wood, or actually anything to do with wood. For instance on Wednesday night I bought a bunch of wood in 2x1x6 feet and 1.5x1x6 feet. But what I didn't realize is that was actually 1.5x.75x6 feet and 1x.75x6feet chunks of wood. I why wood is labeled this way I do not know. But whatever. Also I learned that hand sawing anything beyond 2 inches even with a guide is near impossible for me, the cuts too me back to high school wood shop, yick! My first version of the wood was wavy and too damn small in all the angles. Two new tools So I first purchased the band saw but discovered that what I thought would be a straight edge on a piece of wood was crappy and rounded and just over all not good. I'm not looking to build a masterpiece of a wooden boat but something that hits the measurements within an 1/8th of inch would be nice. So back to the store for more wood, as I ran out! and I

Post-weekend report 1

So my goals were: 1) Fiberglass the inside centerboard trunk. - Completed Bonus points for the following:             a) Glue spacers in             b) Glue centerboard trunk together No bonus points as I'm not sure if I could sand on Sunday as I put on the last coat at 7:30ish Saturday night. But on Sunday I did take the time to visit the hardware store and buy some closet hanger thingys, and rod to hang the fiberglass. Ended up putting it on the garage wall as it is a little over 4 feet wide and the epoxy command station is a little over 2 feet wide. Then to get the fiberglass rod mounted I needed to reclaim some of my garage space. Per pocketship.net CLC recommends storing flat instead of vertical. So out comes another folding table into my back guest bedroom. I cut all remaining parts out of the plywood (soooo tired) and moved them back there. Then once that was moved I leaned the cradle MDF (uncut) against the wall and all the scrap plywood as well. Then mounted the